◯ Hardware Setup
📱 App: Getting Started
🏠 App: Home Screen
💧 App: Logging
📊 App: History
🏆 App: Badges
⚙ App: Settings
⭐ App: Subscription
📑 Reference
SipCube S1 — Full Instructions
SipCube S1 Complete User Guide
Everything you need to set up your SipCube S1 hardware and get the most out of the mobile app.
◯
Hardware Setup
Unboxing to first tracked sip in under 10 minutes
BOX
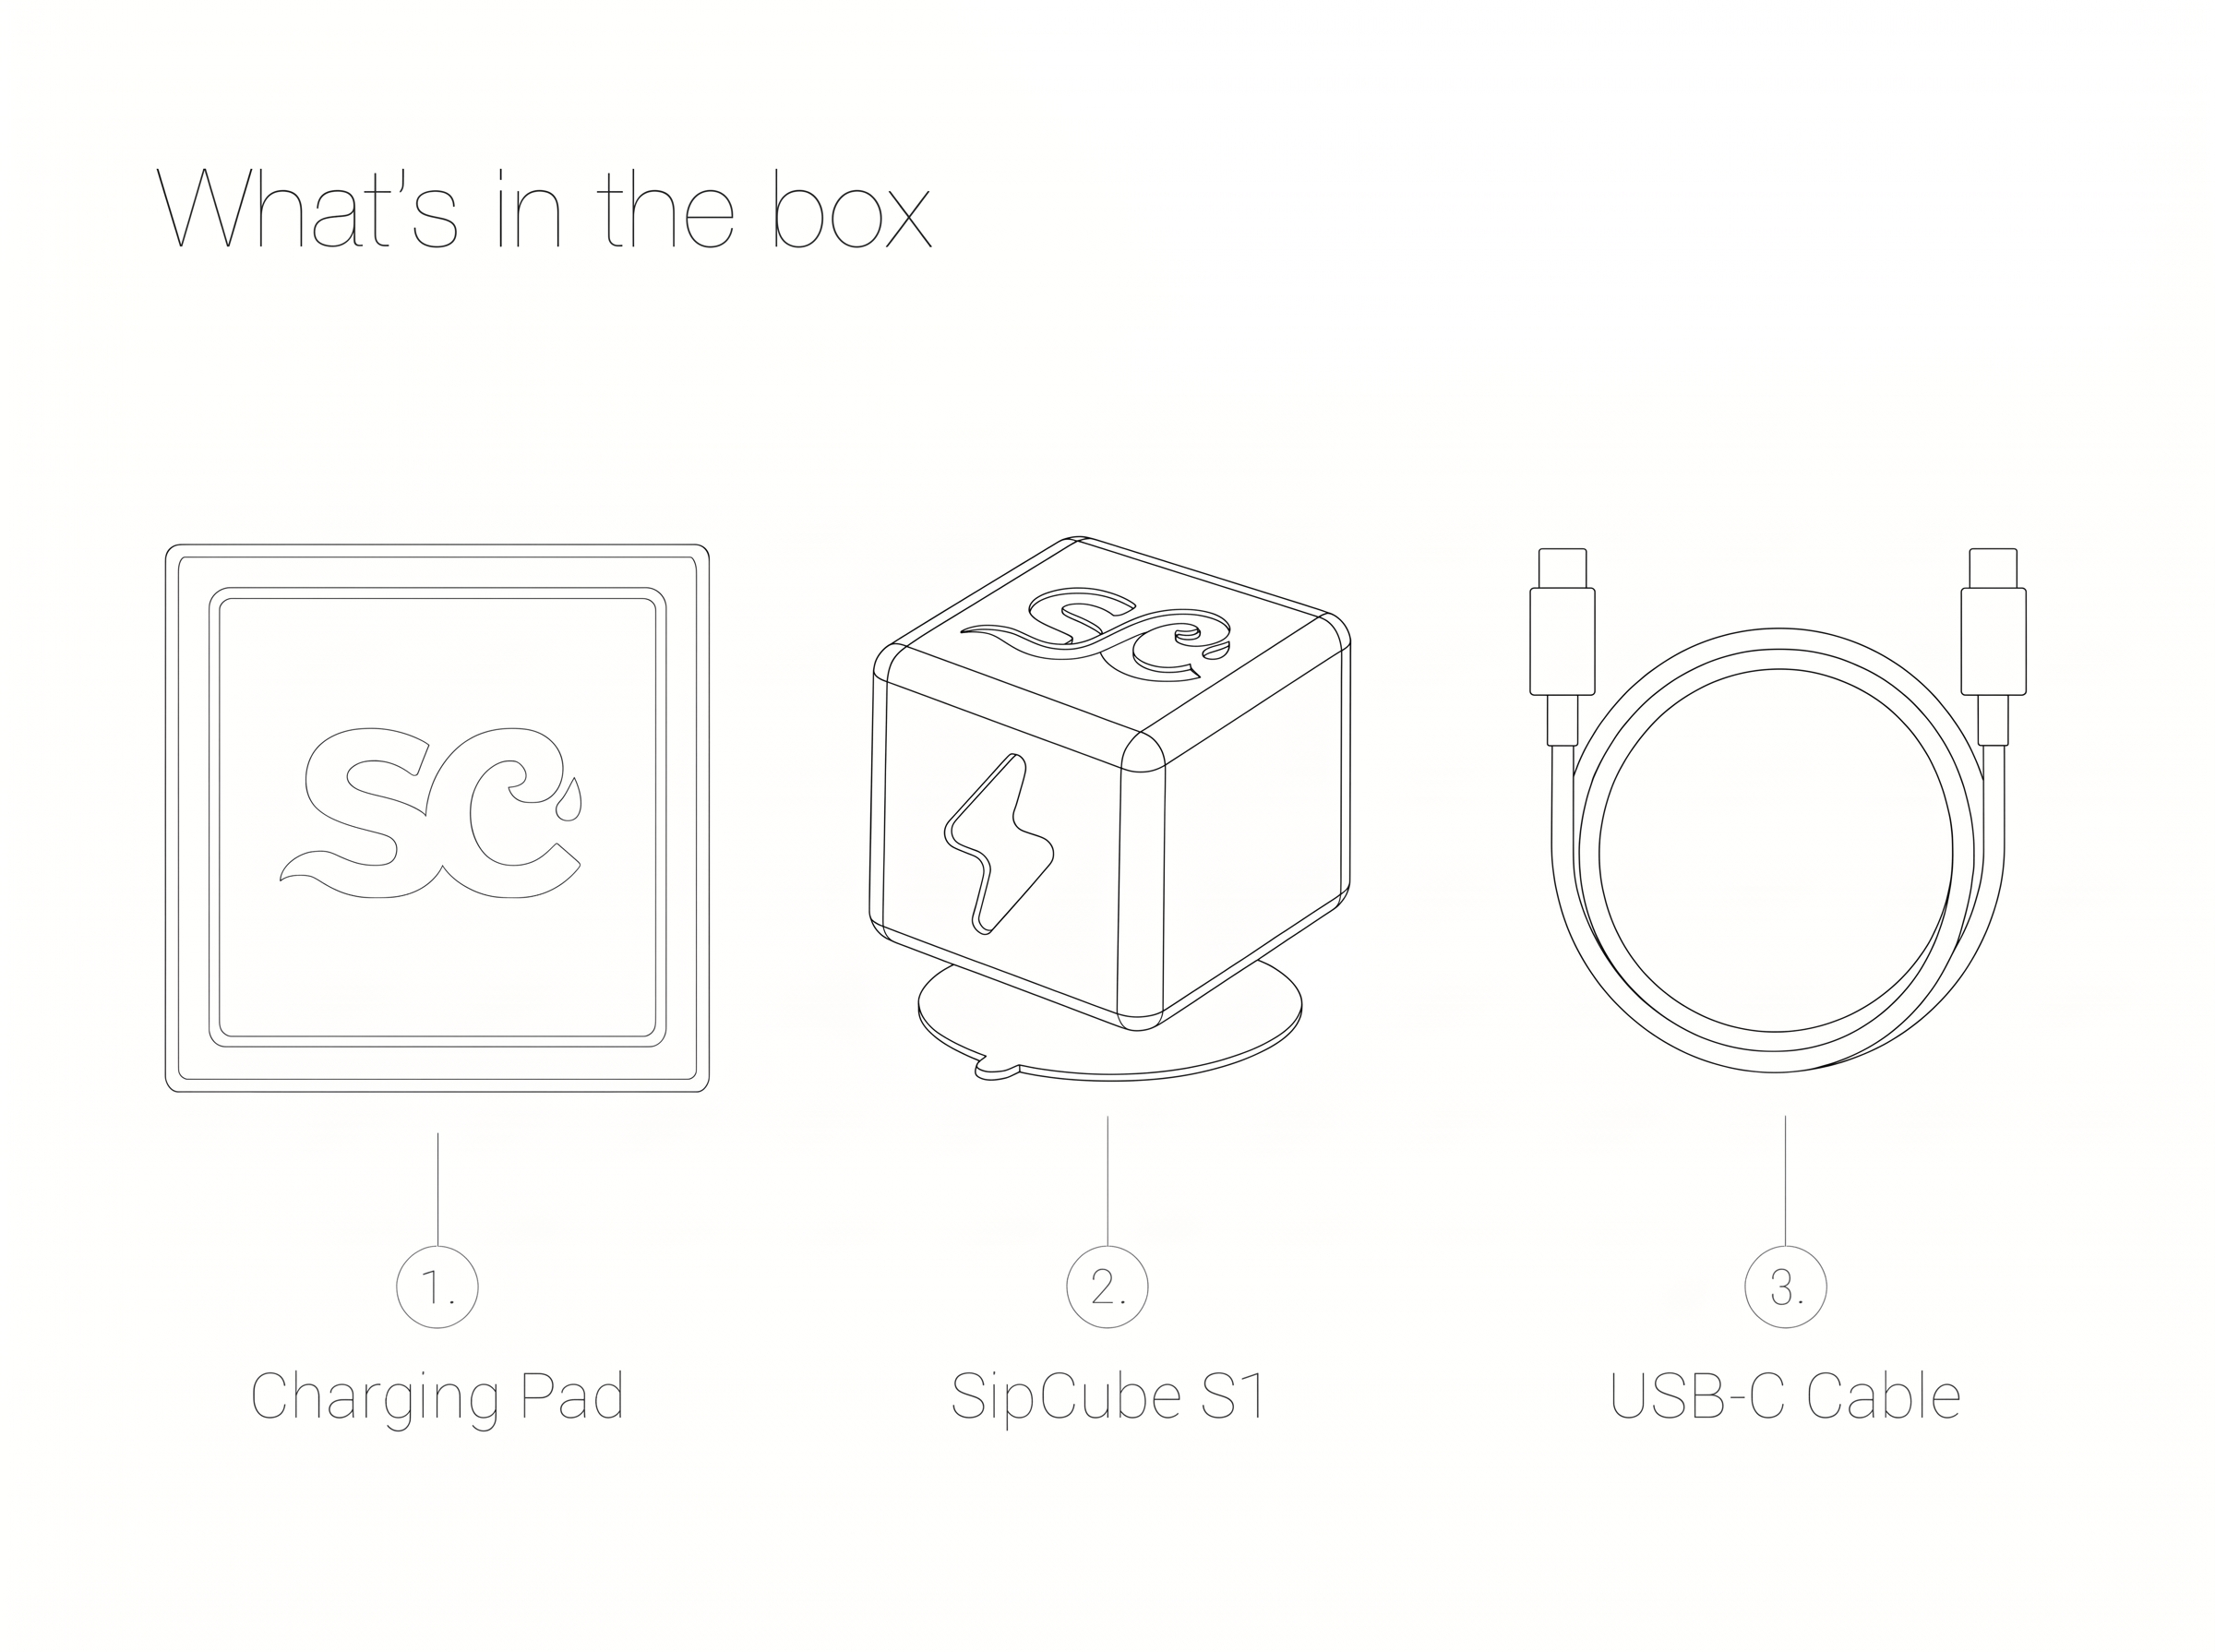
What’s in the box
Before getting started, confirm all six items are present.
□
1. Charging Pad
Wireless charging pad with SipCube logo. Connect via USB-C.
■
2. SipCube S1
The tracking cube with suction base. Your hydration sensor.
🔌
3. USB-C Cable
For powering the charging pad. USB-A to USB-C, 1m.
🔧
4. Gripper Tool
Used to press SipCube firmly to the bottom of your bottle without reaching inside.
🔗
5. Grabber
Used to break the suction seal and remove SipCube from your bottle cleanly.
↕︎
6. Extension
Attaches to the gripper or grabber to reach the bottom of taller bottles.
🔧
Tools & accessories
Three included tools let you install and remove SipCube without ever reaching inside your bottle.
🔧
Gripper tool — install
The gripper presses the suction base of SipCube firmly against the bottom of your bottle. Hold the cube with the gripper, lower it to the base of the bottle, and press down until the suction cup seats. No hand inside the bottle required.
🔗
Grabber — removal
To remove SipCube, slide the grabber along the inside of the bottle until it reaches the edge of the suction cup. Press down at the rim to break the seal, then lift SipCube straight out. This prevents residue transfer from hands to the inside of your bottle.
↕︎
Extension — tall bottles
The extension piece clicks onto either the gripper or grabber to add extra reach. Use it with bottles where the base cannot be reached comfortably with the standard-length tools — most bottles taller than roughly 25 cm (10 in) will benefit from the extension.
💡
Always use the gripper and grabber rather than inserting your hand into the bottle. This keeps the inside of your bottle clean and prevents accidental damage to the pressure sensor.
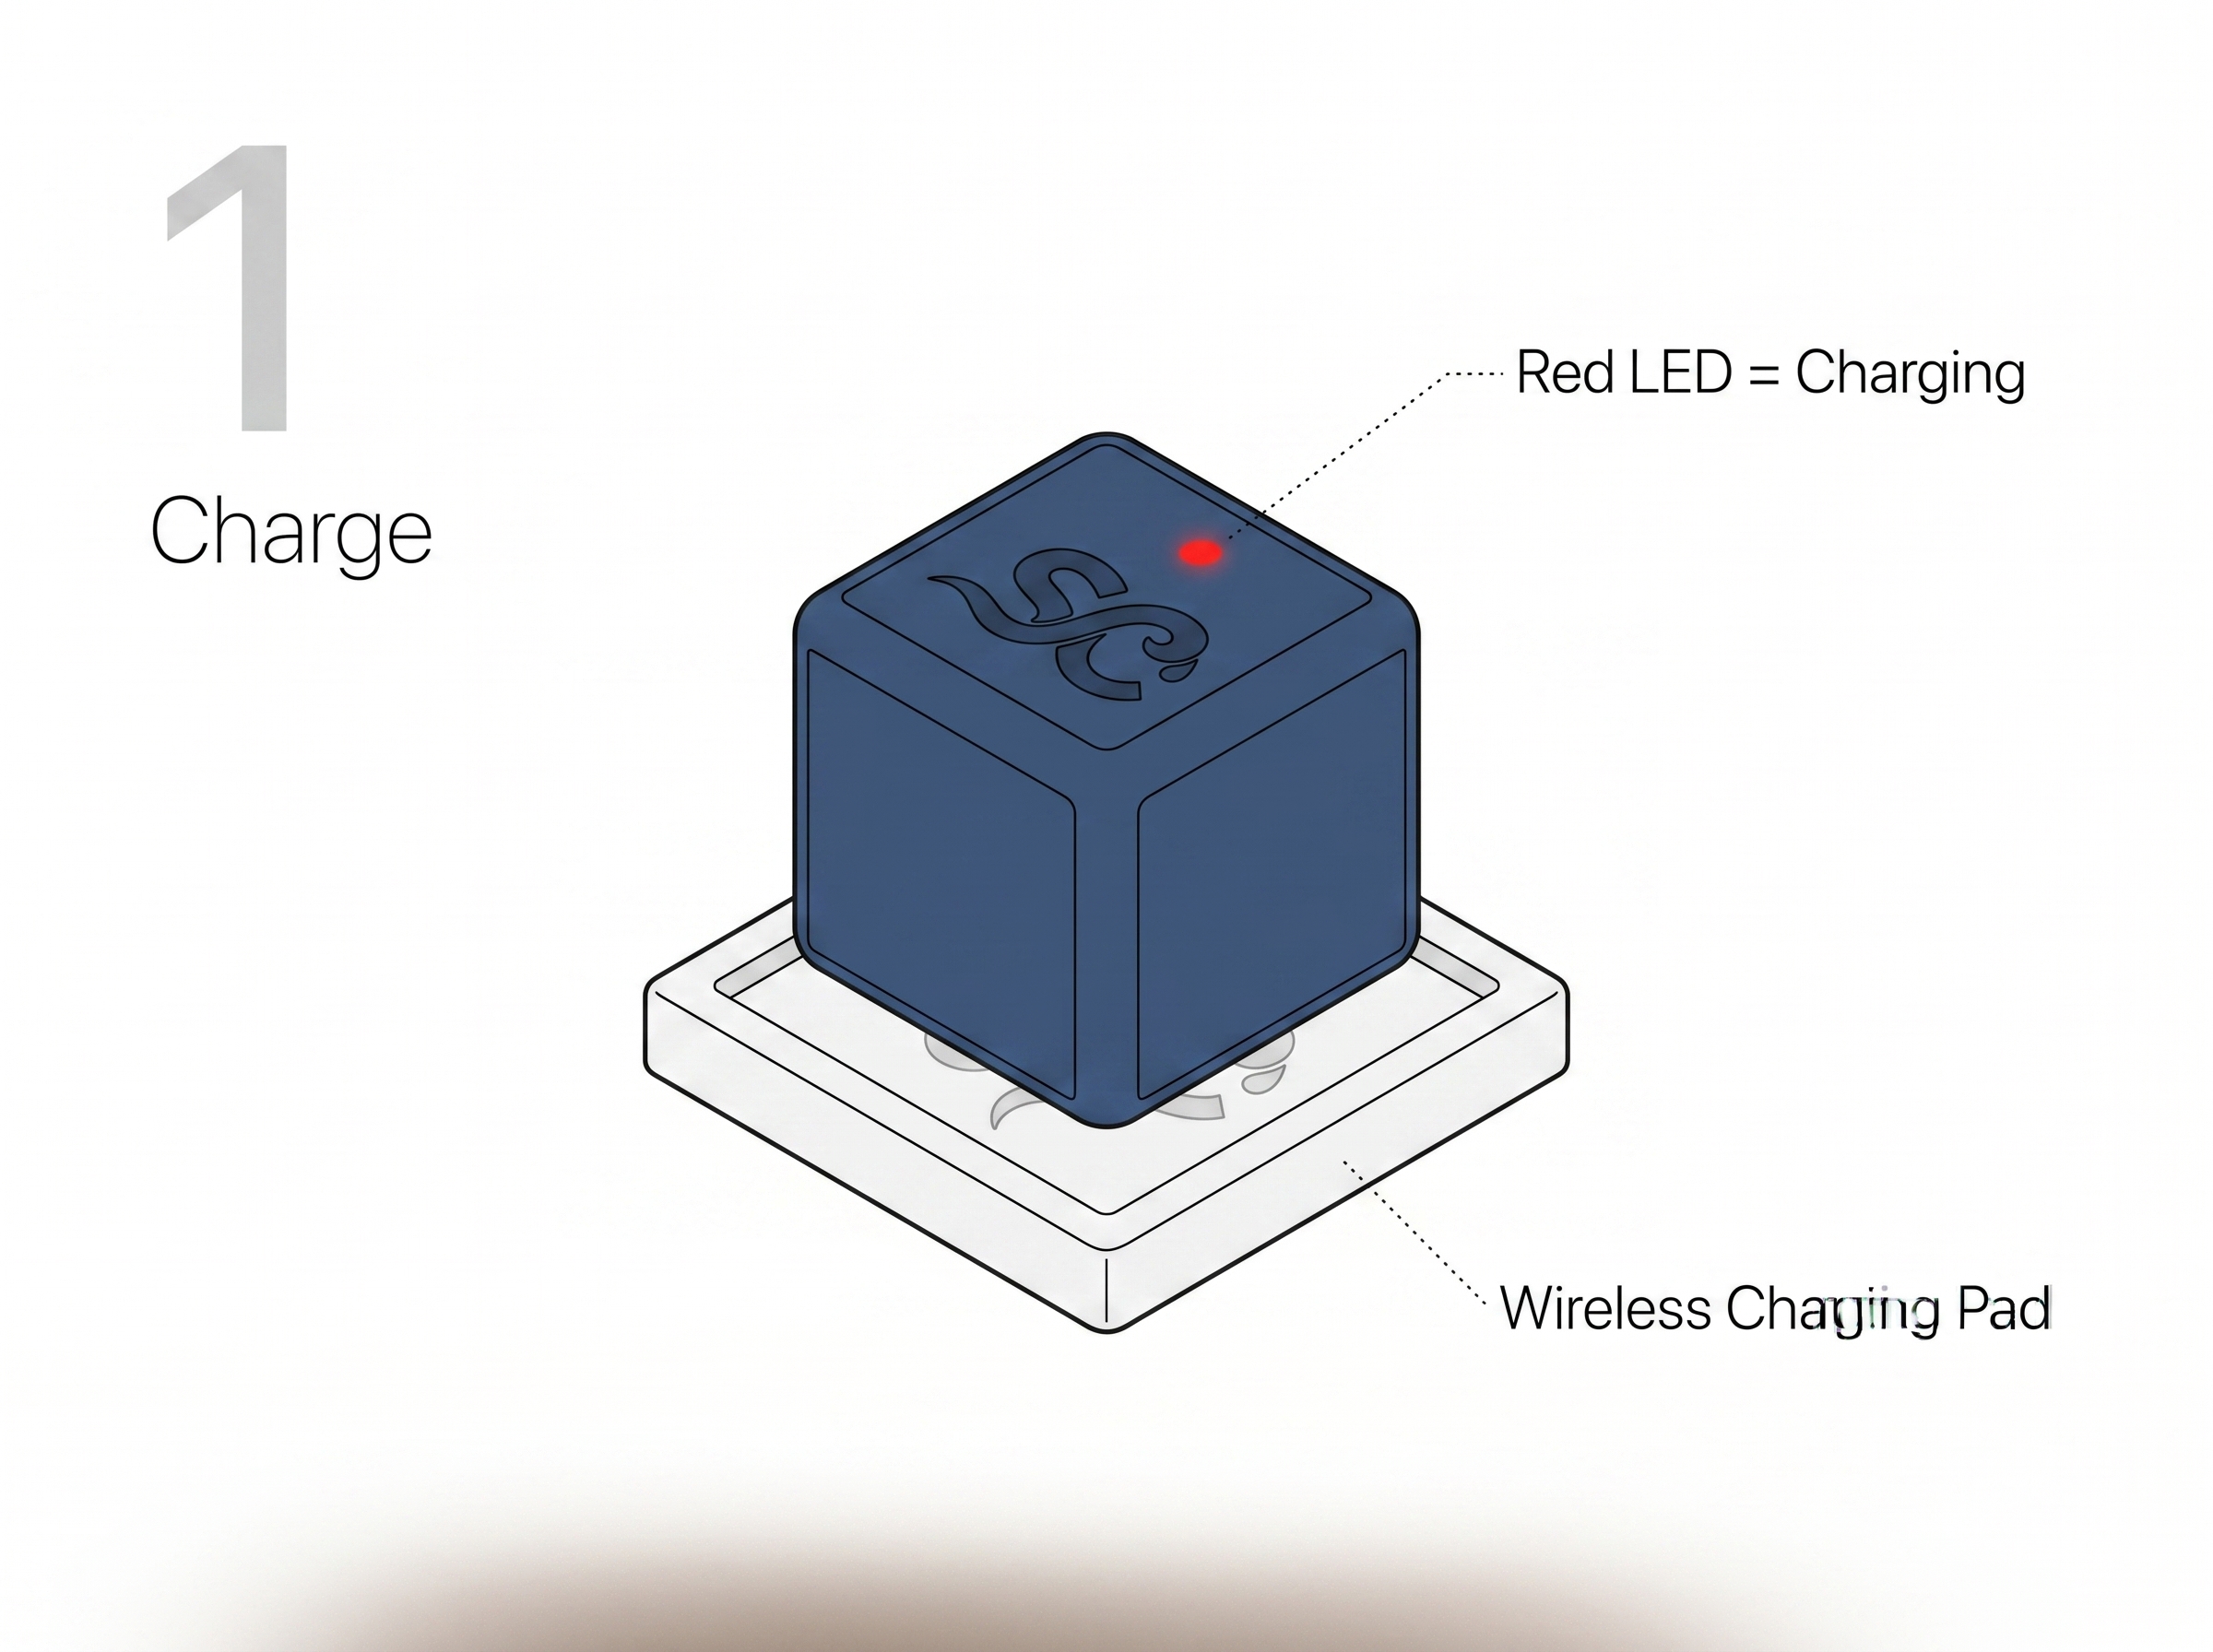
1
Charge your SipCube
Before first use, charge the SipCube S1 fully. This takes approximately 2 hours.
1
Connect the charging pad
Plug the USB-C cable into the charging pad and connect the other end to a USB power source (wall adapter, laptop, or power bank).
2
Place SipCube on the pad
Set the SipCube squarely on the centre of the charging pad. The red LED on top of the cube will light up to confirm charging has started.
3
Wait for full charge
The red LED turns off automatically when the battery is full. This typically takes 1.5–2 hours from empty.
🔴Red LED = Charging. Red LED off (while on pad) = fully charged and ready to use.
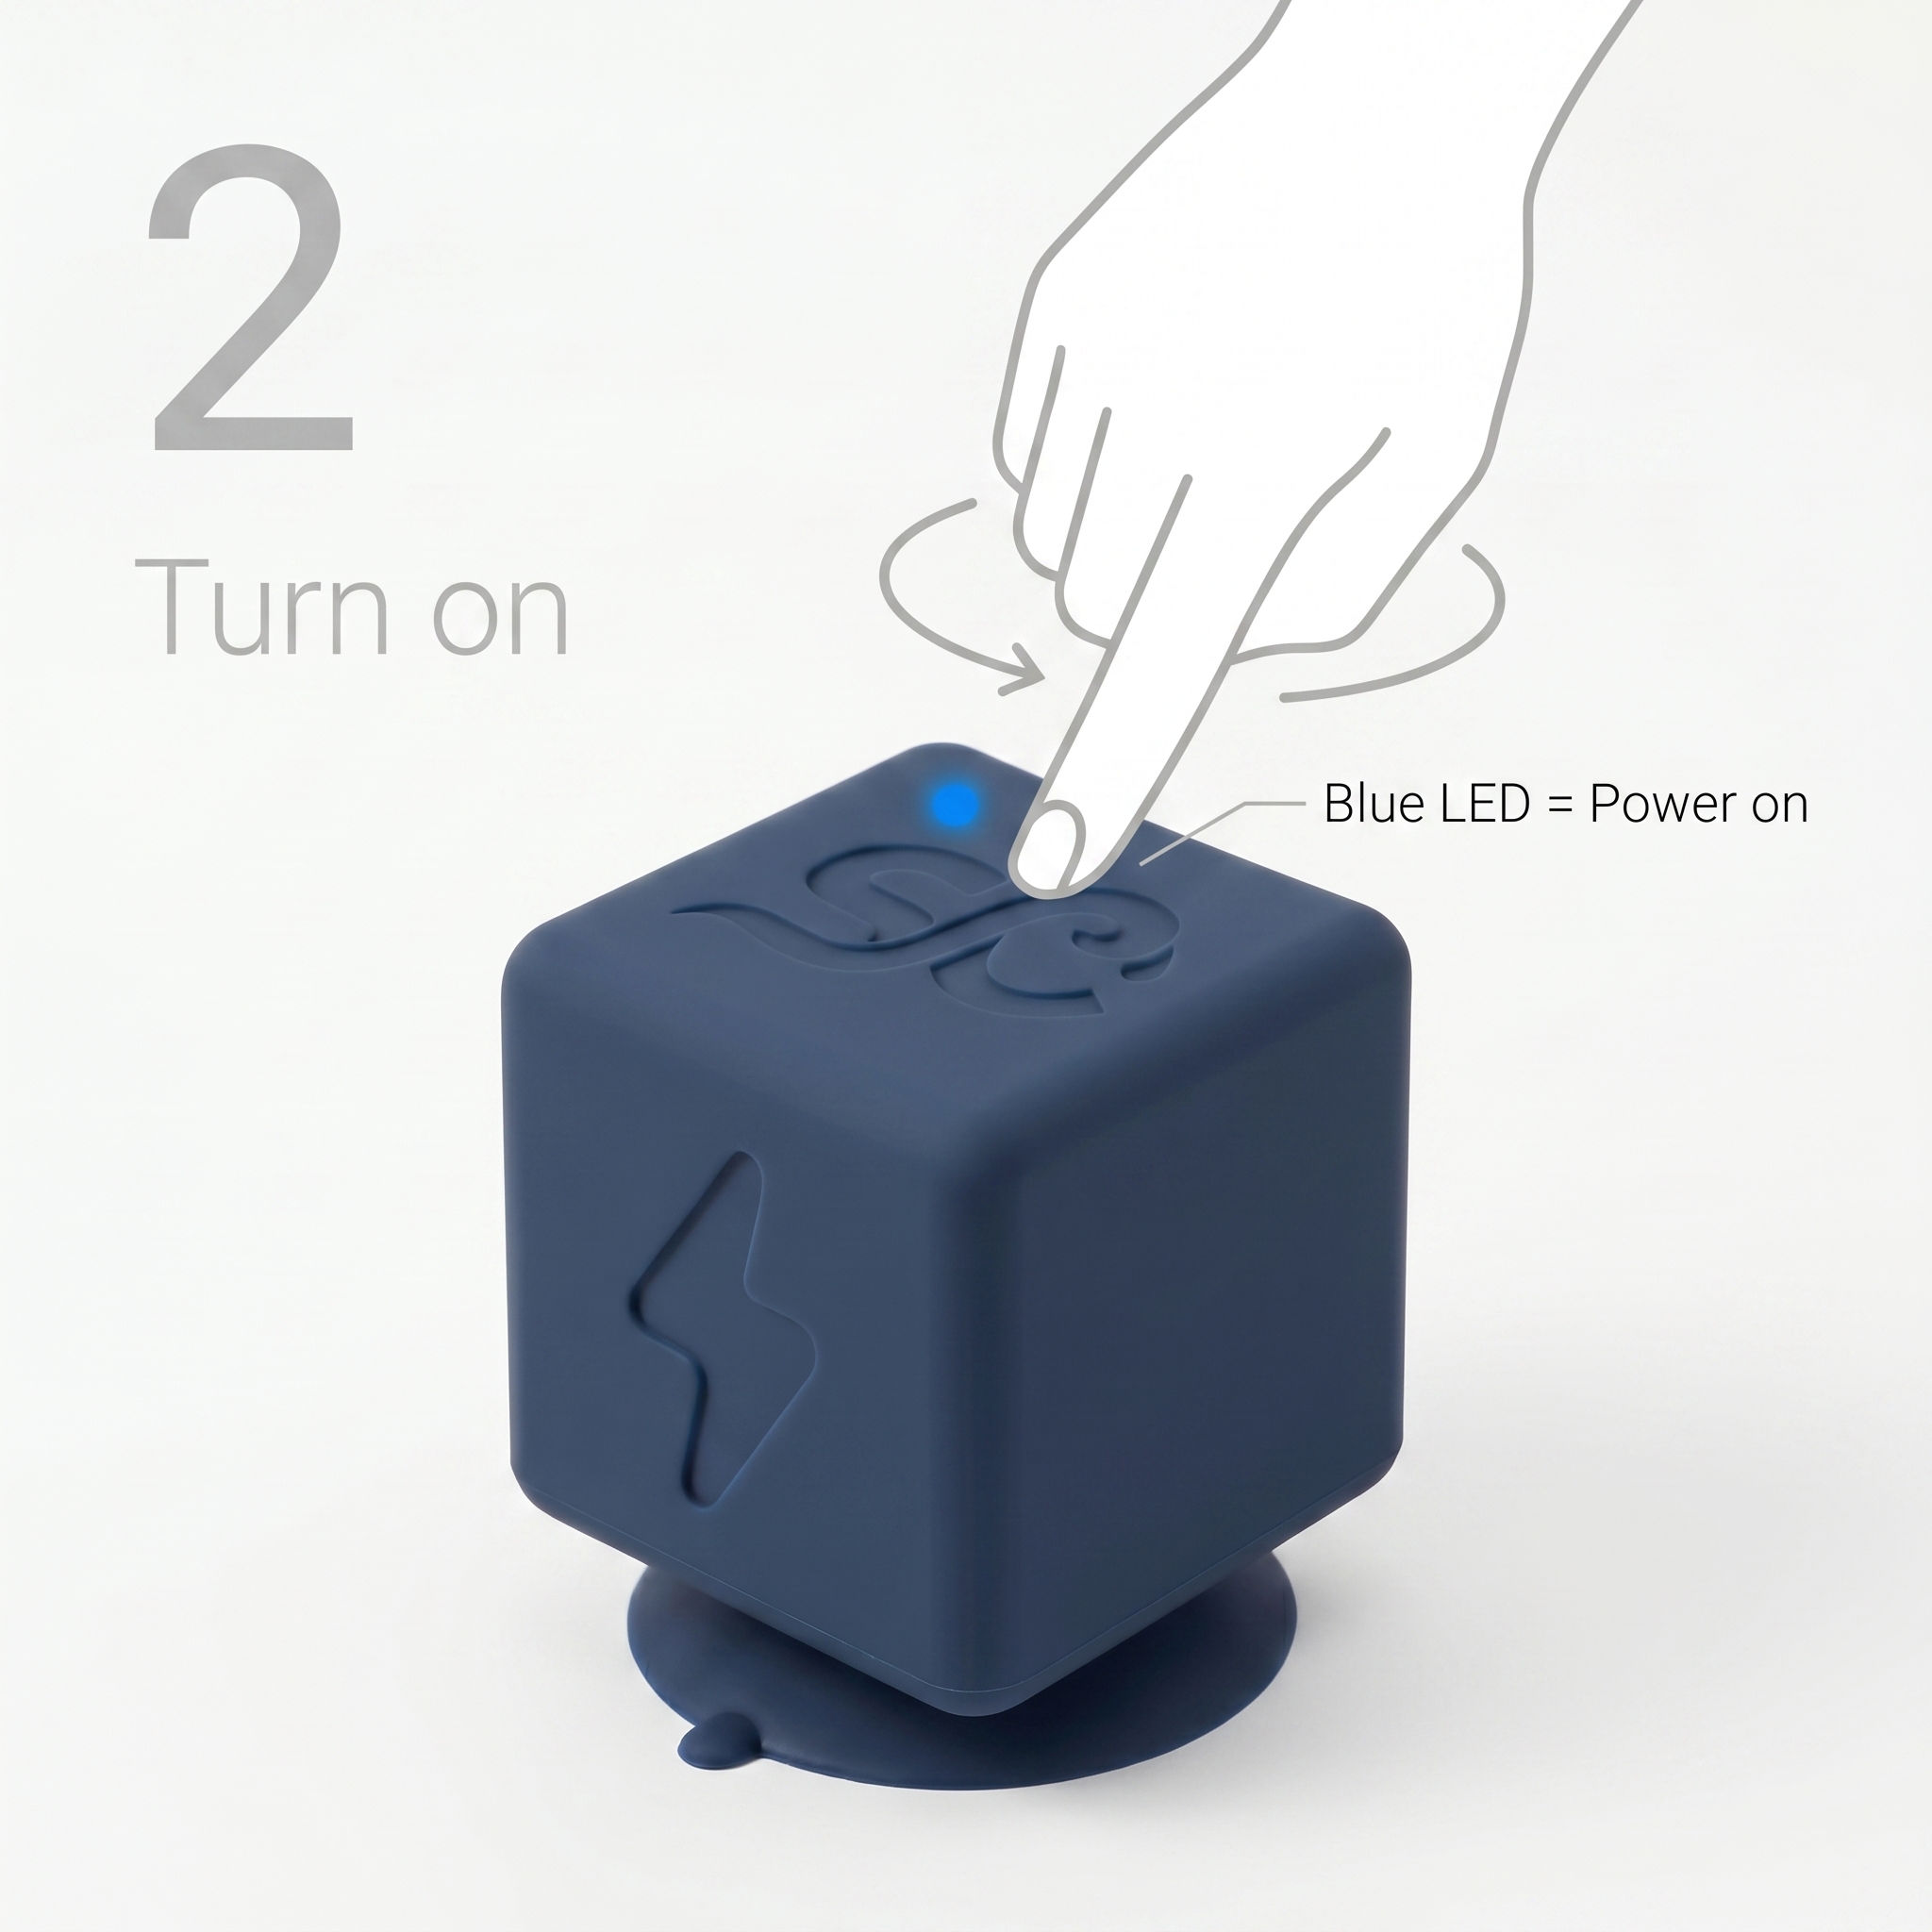
2
Turn it on
Remove SipCube from the charging pad and power it on.
1
Remove from charging pad
Lift the SipCube off the wireless charging pad.
2
Press the button once
Press the button on the top face of the cube once. A blue LED will light up confirming the device is on.
🔵Blue LED = Powered on. The cube is now searching for your phone via Bluetooth.
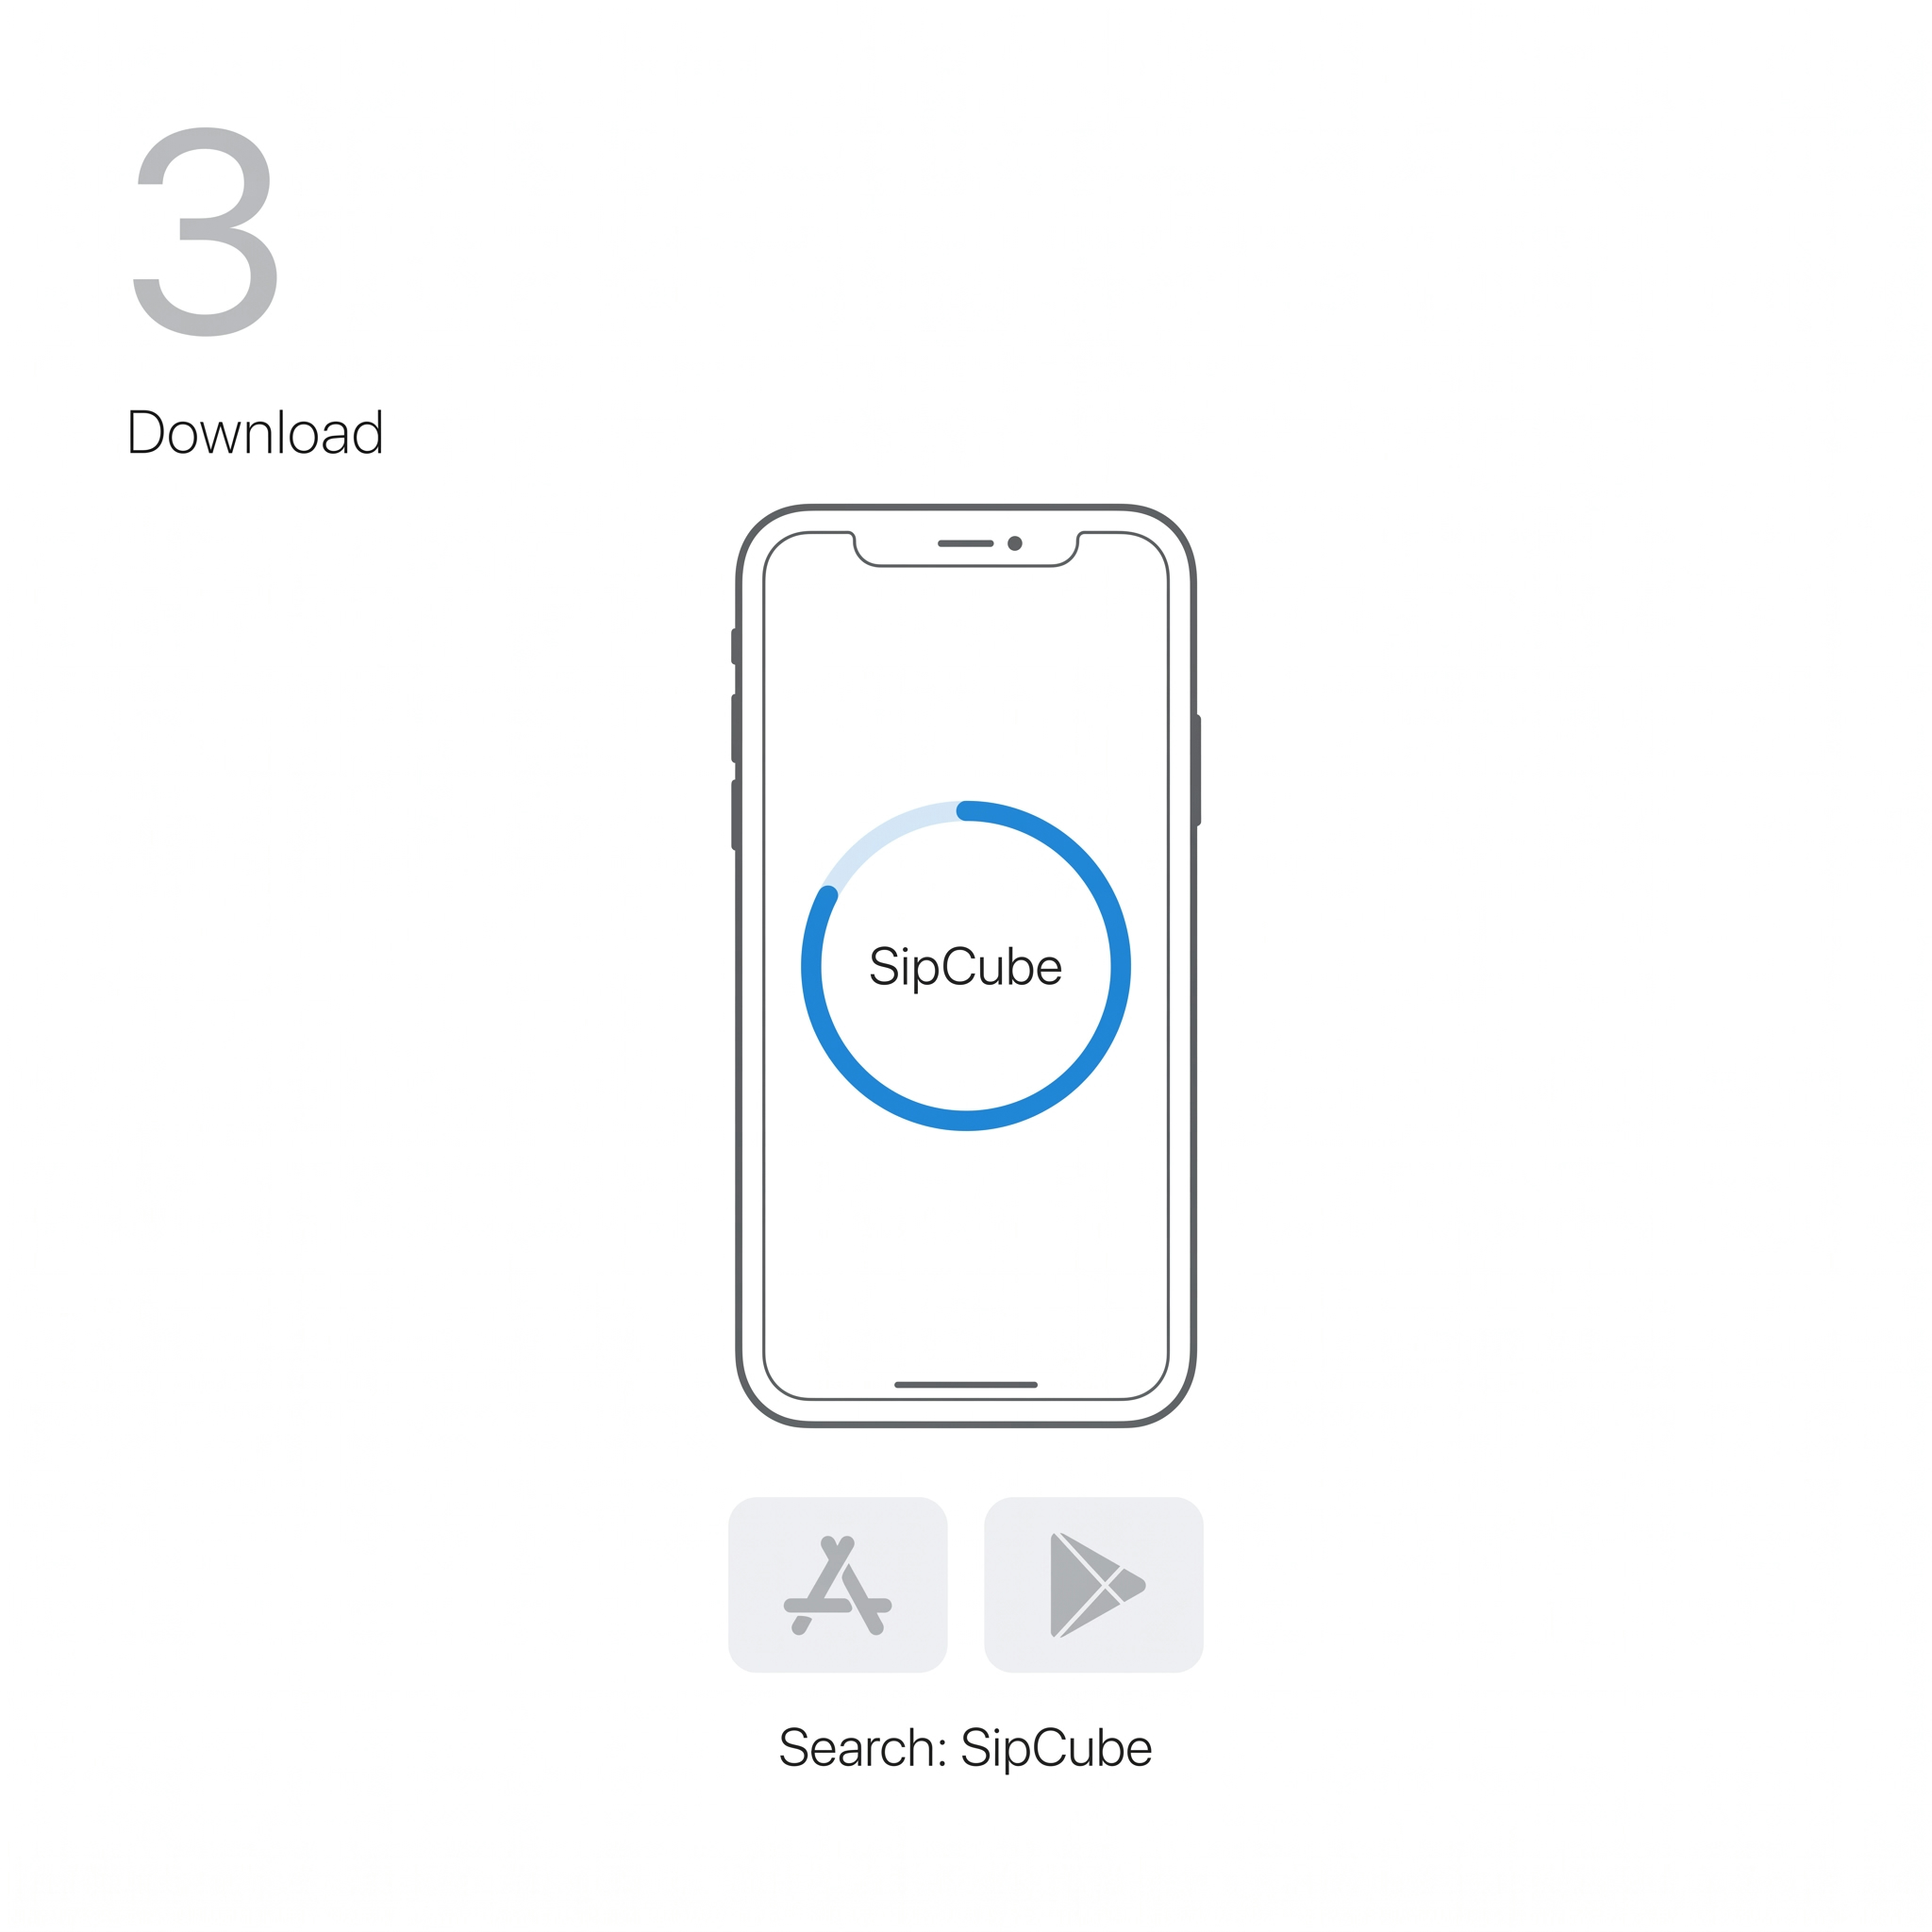
3
Download the SipCube app
Available free on iOS and Android.
1
Open the App Store or Google Play
On your iPhone or Android phone, open the App Store (iOS) or Google Play Store (Android).
2
Search “SipCube”
Tap the search icon and type SipCube. Download the free app.
3
Create an account
Open the app and sign up with your email or Google account. This saves your data to the cloud.
📱Requires iOS 15+ or Android 8+. Make sure Bluetooth is enabled on your phone before the next step.
4
Connect via Bluetooth
Pair your SipCube S1 to the app.
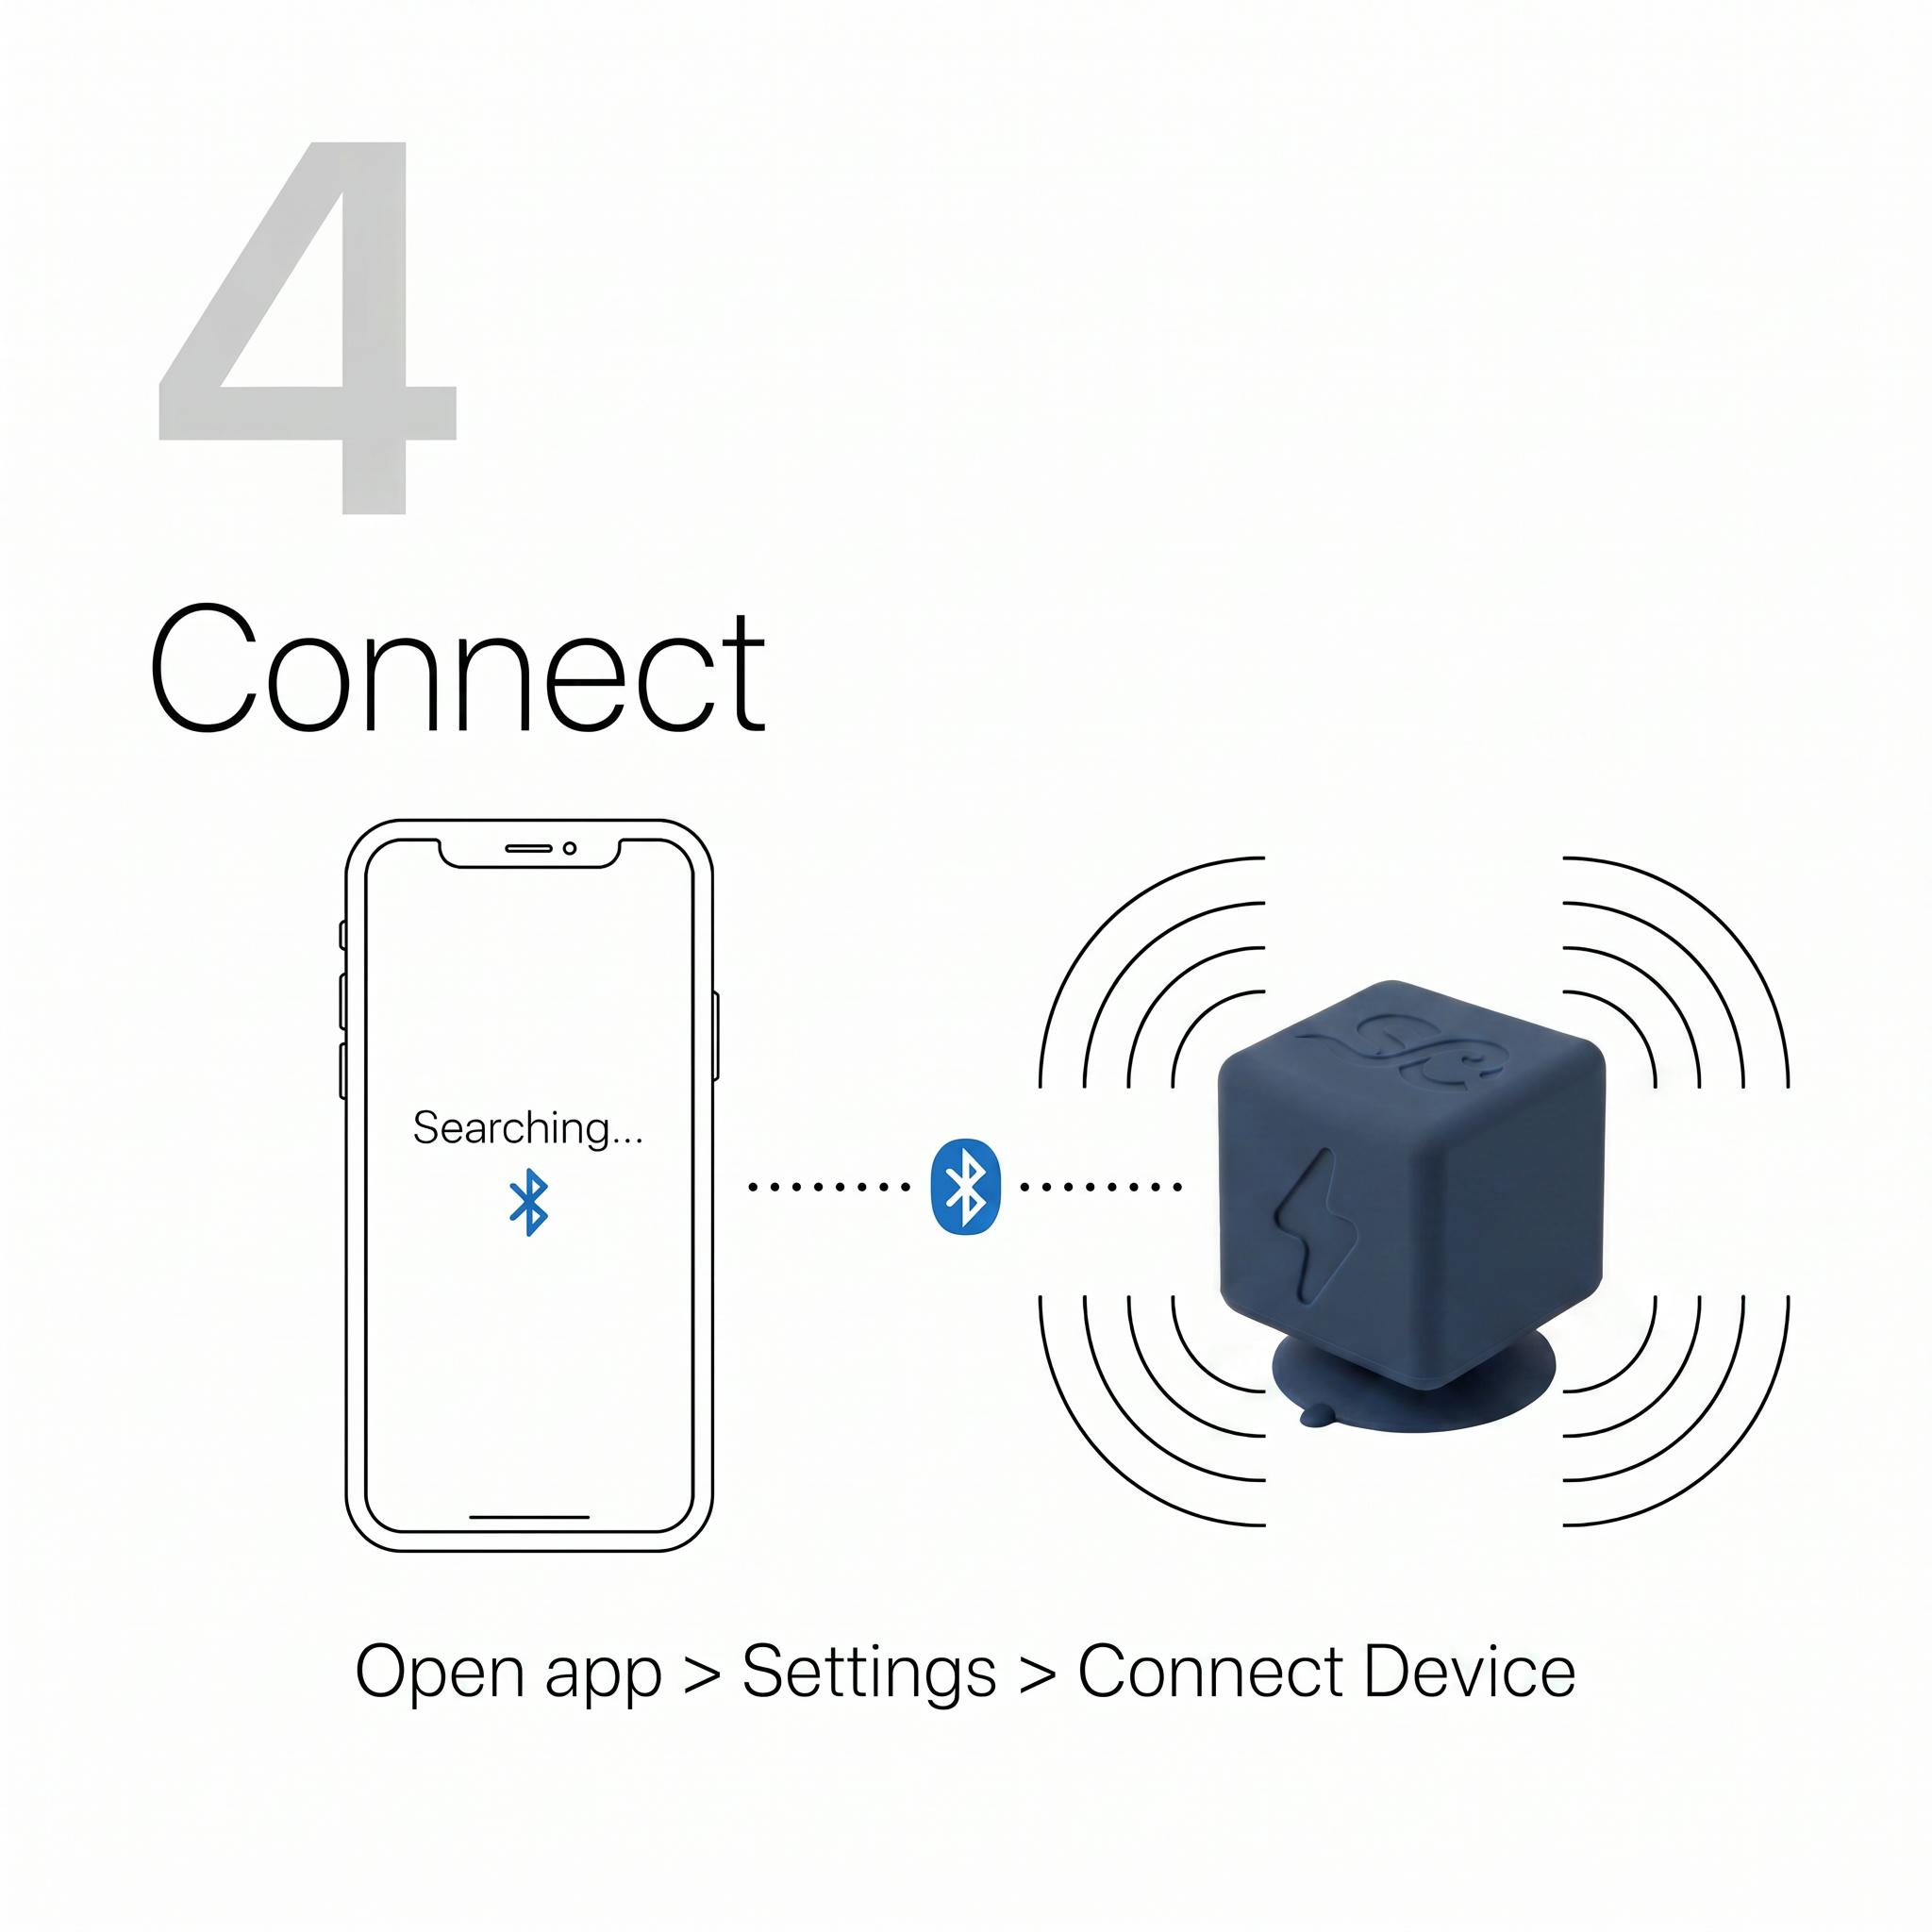
1
Open the app
Make sure SipCube is turned on (blue LED blinking slowly) and within 1 metre of your phone.
2
Go to Settings → Connect Device
In the app, tap the Settings tab at the bottom, then tap Connect Device. The app will scan for nearby SipCube devices.
3
Tap your device to pair
Your SipCube S1 will appear in the list. Tap it to connect. The LED stops blinking once paired.
🔌If SipCube doesn’t appear in the scan list, press the button once to wake it up, then try scanning again.
5
Calibrate your bottle
This teaches SipCube your bottle's shape so water levels are accurate.

1
Install SipCube in your bottle
Use the included gripper tool to lower SipCube to the bottom of your bottle and press the suction base firmly into place — no hand inside the bottle required. The suction base fits any wide-mouth bottle 50mm or wider internally. Use the extension for taller bottles.
2
Go to Settings → Calibrate Device
In the app, tap Settings then Calibrate Device. Follow the on-screen steps — it will ask you to fill your bottle to specific levels.
3
Confirm calibration
The app confirms with “SipCube is now calibrated for your bottle.” You only need to do this once per bottle.
🏦If you switch to a different bottle, recalibrate via Settings → Calibrate Device. You can also select from a library of popular bottle models.
6
Start drinking
SipCube tracks every sip automatically from this point forward.
1
Drink normally
The pressure sensor detects each sip and logs it automatically. No button presses, no app tapping required.
2
Watch it sync
Open the app. Each sip appears in your Home screen log within 3 seconds of drinking.
3
Check your goal
The large progress ring on the Home screen shows your percentage toward today’s personalised hydration goal.
💧Works best with: still water, juices, and non-carbonated cold drinks. Avoid carbonated beverages and liquids above 140°F / 60°C.
LED
LED Guide
The single LED on the top face communicates all device states.
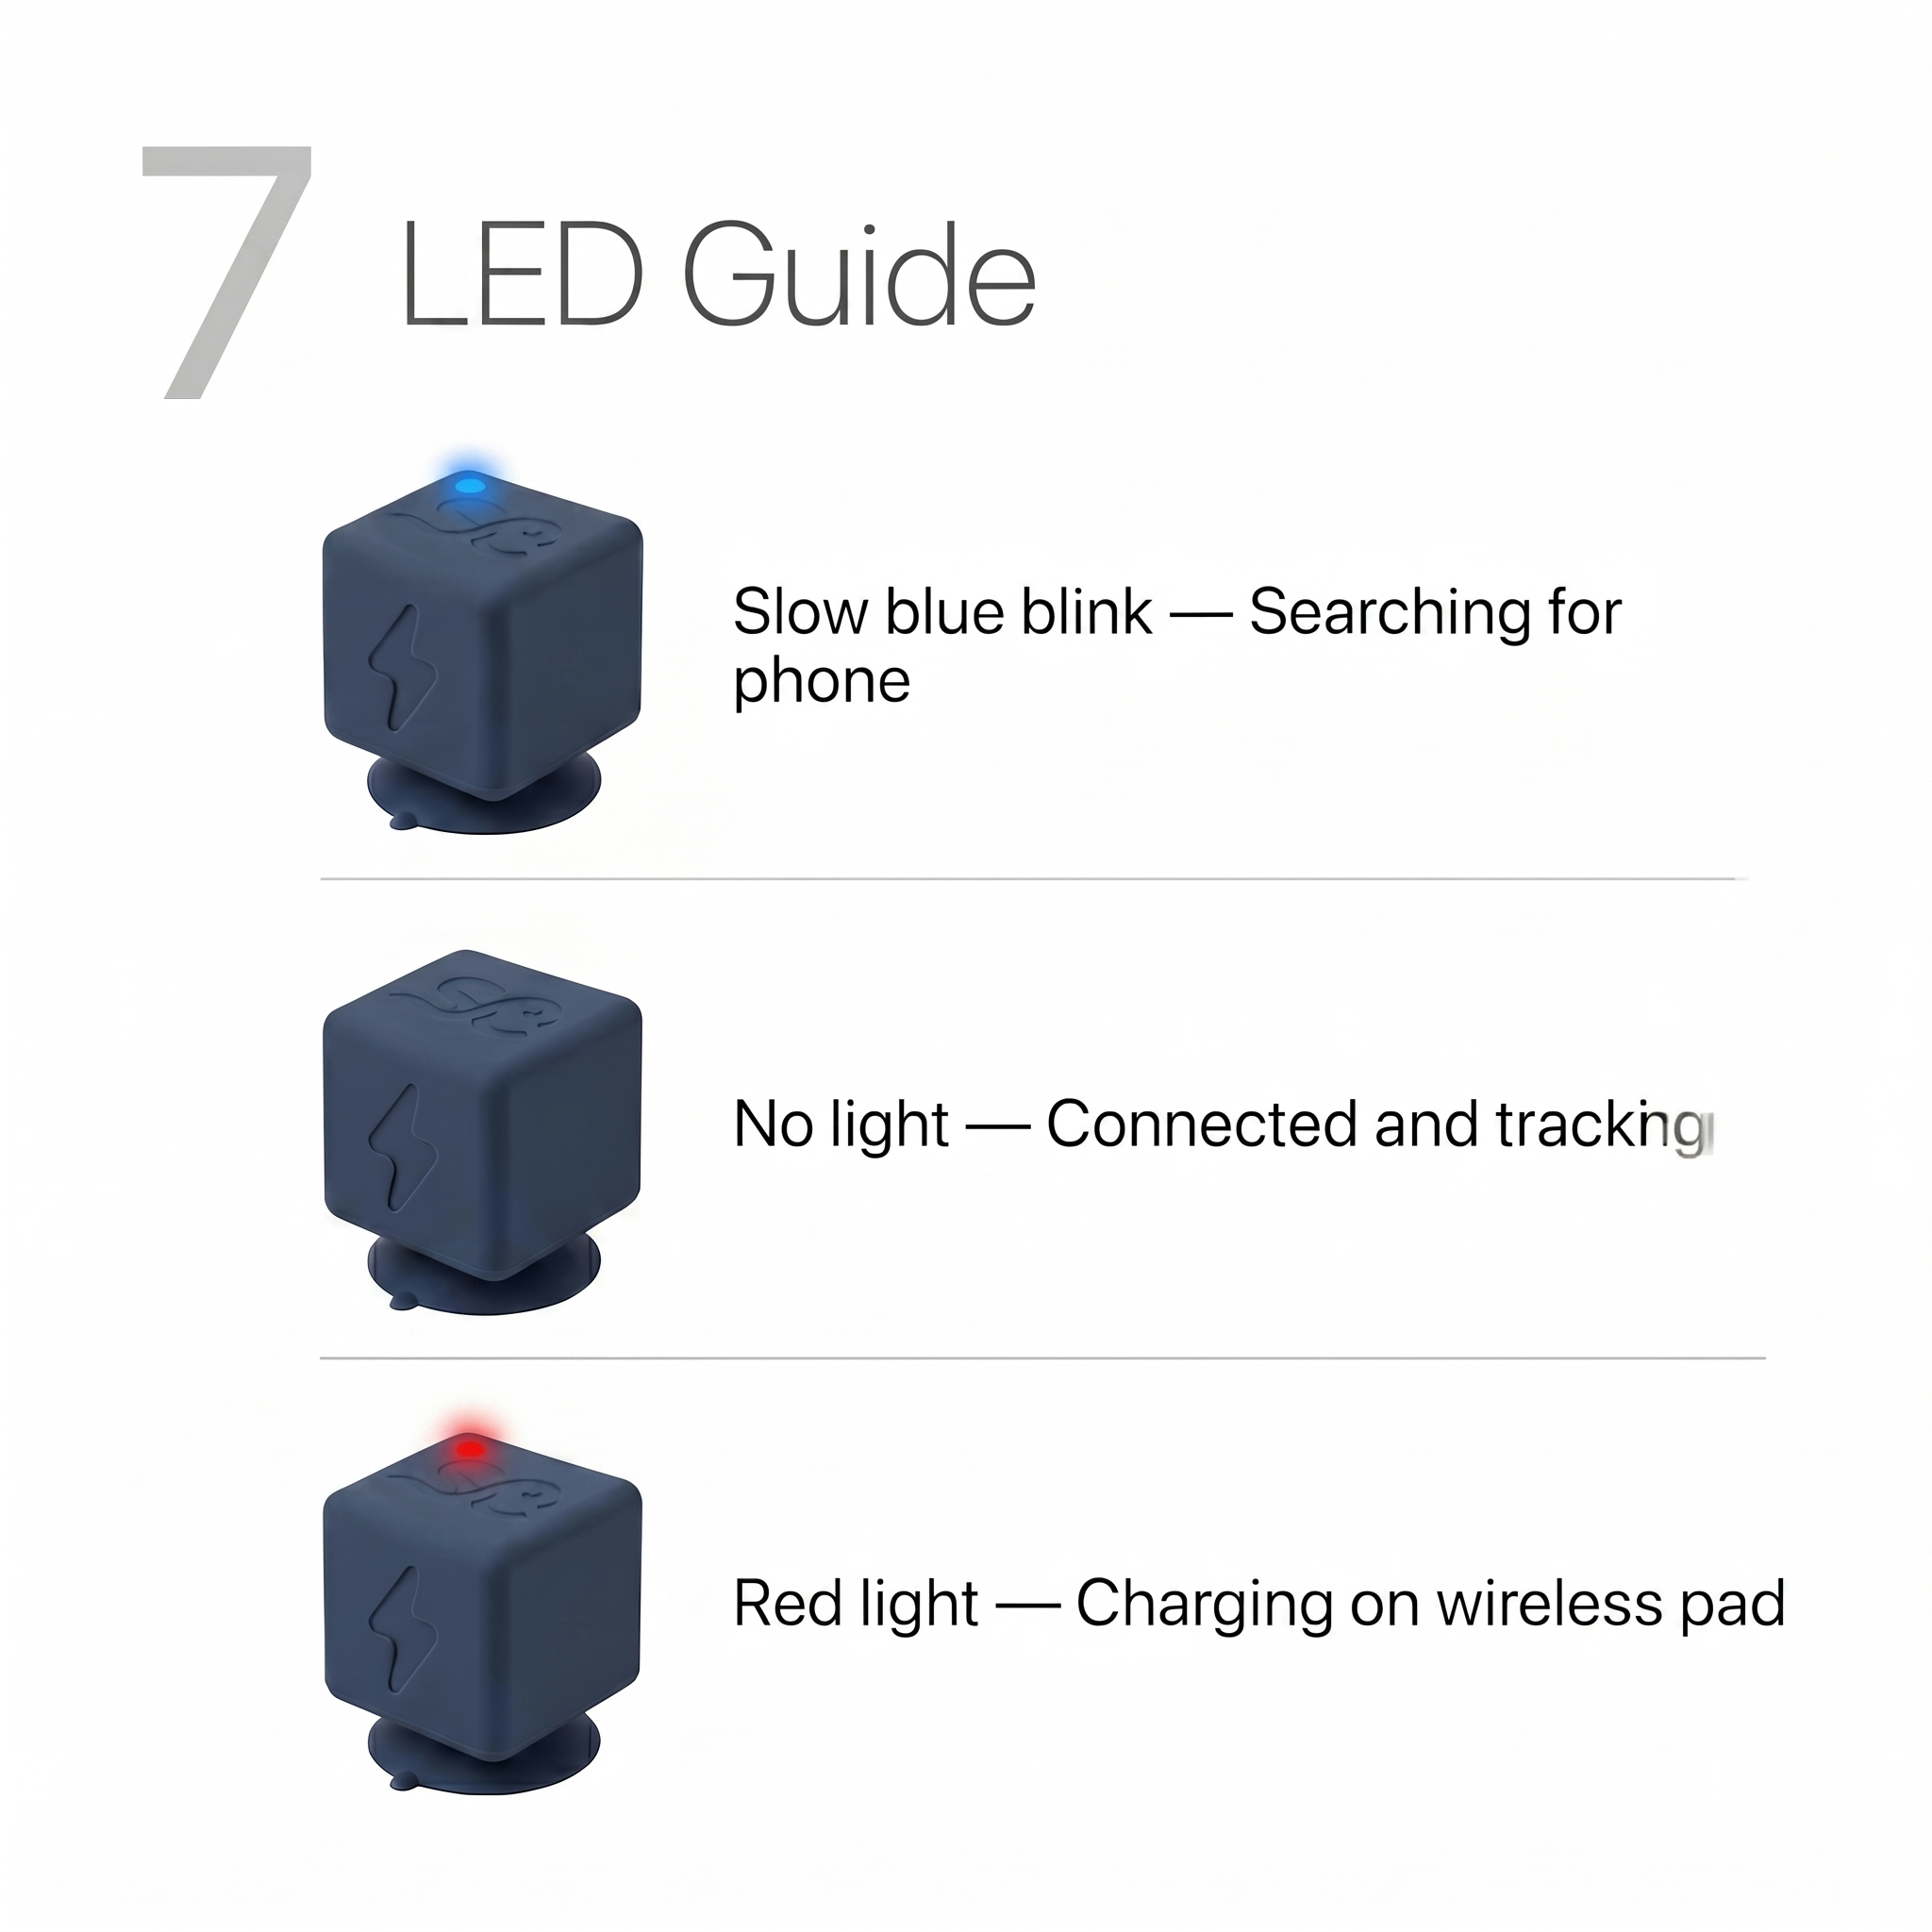
| LED State | Meaning | What to do |
|---|---|---|
| Slow blue blink | Powered on, searching for phone | Open the app and check Settings → Connect Device |
| No light (on) | Connected to app and tracking | Nothing — this is normal active use |
| Red light | Charging on wireless pad | Wait until LED turns off (= fully charged) |
| No light (on pad) | Fully charged | Remove from pad and press to power on |
PWR
Power Guide
One button, four actions.
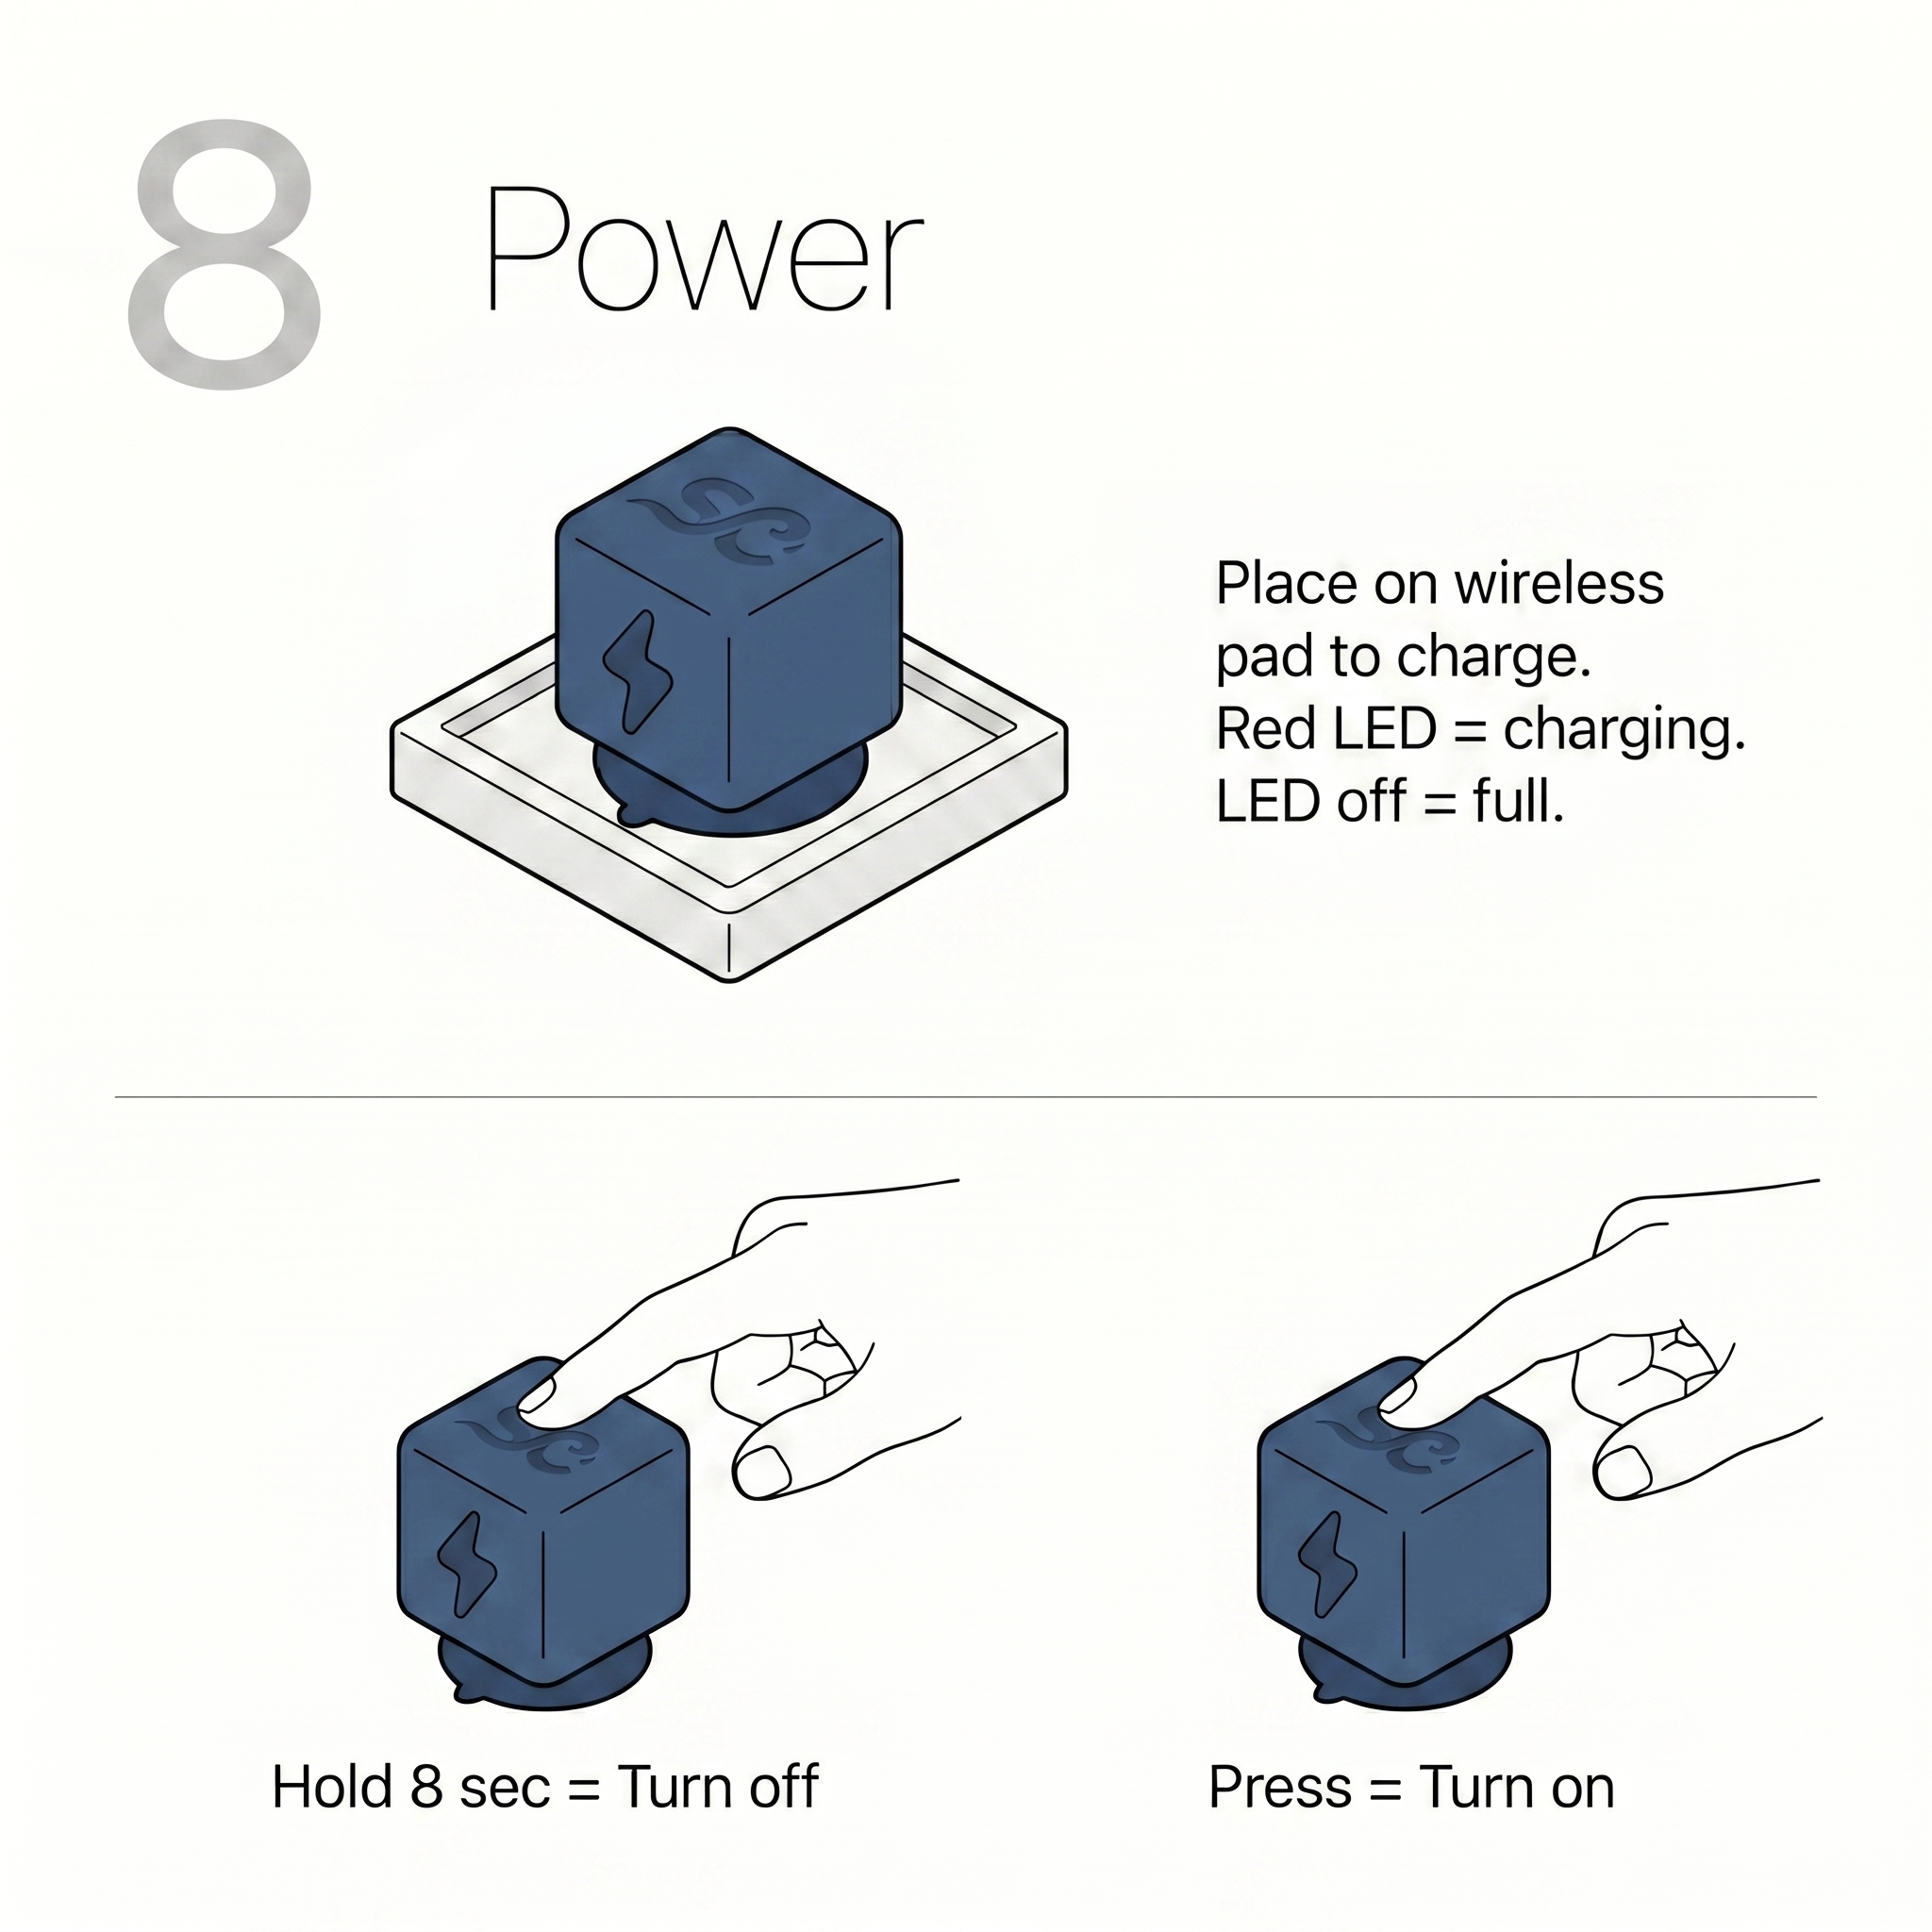
| Action | Result |
|---|---|
| Press once | Turn on — blue LED lights up |
| Hold 8 seconds | Turn off — LED flashes twice then off |
| Place on charging pad | Start charging — red LED lights up |
| Remove from pad (LED off) | Fully charged — press once to turn on |
📱
App: Getting Started
Account creation and onboarding
🖊
Creating your account
Sign up once — your data syncs across all your devices.
1
Open the app and tap “Sign Up”
On the welcome screen, tap Sign Up to create a new account. Or tap Sign In if you already have one.
2
Enter your details
Enter your display name, email address, and a password (minimum 8 characters). Or tap Continue with Google for one-tap sign-up.
3
Verify your email
Check your inbox for a verification email and tap the link. Then return to the app to continue.
▶
Onboarding (6 steps)
The app walks you through setup once after sign-up. Each step personalises your experience.
1
Your Profile
Tell us the basics so the app can calculate a personalised daily hydration goal based on IOM standards.
Display name
Weight (kg or lbs)
Biological sex
Age
Activity level
2
Your Schedule
Set your wake time and bed time. Reminders will only fire within your drinking window. Choose your preferred reminder frequency.
Wake time
Bed time
Reminder frequency (1h / 1.5h / 2h)
3
Your Environment
The app uses your location to factor in altitude and climate zone. Tap “Detect my location” or skip if you prefer not to share location.
GPS location (optional)
Altitude
Climate zone
4
Your Goal
Review your calculated daily goal with a full breakdown of every factor. You can override it with a custom value if you prefer a fixed goal.
Calculated goal breakdown
Custom override (optional)
Unit preference (ml / fl oz)
5
Connect Your Device
Pair your SipCube S1 via Bluetooth. The app scans automatically. Tap your device when it appears. You can skip this and connect later in Settings.
BLE scan & pair
Bottle selection from library
6
Supplements & Medications
Tell the app about any supplements or medications that affect hydration (e.g. caffeine, diuretics). Each adds a goal modifier.
Caffeine (+150ml)
Diuretics (+300ml)
Other medications
✓After onboarding, your goal, schedule, and device are all set up. You’ll land on the Home screen ready to start tracking.
🏠
App: Home Screen
Your daily hydration dashboard
🏠
Understanding the Home screen
The Home screen is your hydration dashboard. Everything updates in real time as you drink.
◯
Progress Ring
Large circle showing % of today’s goal. Centre shows ml consumed vs. goal. Glows when nearing 100%.
🌥
Weather Widget
Current temperature, humidity, and city. Shows “Goal adjusted” badge when heat or humidity increases your target.
🔥
Streak Card
Your current streak in days. Shows progress toward the next badge milestone.
🏨
Bottle Meter
Live water level in your bottle (requires connected SipCube S1). Tap “Refilled” when you top up.
📋
Today’s Log
Scrollable list of every drink logged today with time, type, and volume. Swipe left on any row to delete it.
⚡
Device Status
Battery percentage badge in the top-right when SipCube is connected. Tap to go to device settings. Red warning at <20%.
+Tap Log a Drink at the bottom of the Home screen to manually add a drink (e.g. coffee, juice) that SipCube can’t track automatically.
💧
App: Logging Drinks
Manually log any drink SipCube can’t track
+
How to log a drink
SipCube auto-tracks water in your bottle. Use the Log screen for coffee, tea, juice, or other drinks from a different container.
1
Tap “Log a Drink” on the Home screen
Or tap the Log tab in the bottom navigation bar.
2
Choose your beverage
Tap the beverage selector to open the full drink library. Search or scroll to find your drink. Each shows its hydration multiplier (e.g., coffee = 80%, alcohol = 50%).
3
Set the amount
Tap a quick-select button (150ml, 250ml, 350ml, 500ml, 750ml, 1000ml) or type a custom amount.
4
Add ice if relevant
Toggle Contains Ice and select the ice percentage (10%, 20%, 30%). The app deducts the ice volume from your hydration credit automatically.
5
Tap “Log Drink”
The entry is saved and the Home screen progress ring updates immediately.
📅Hydration credit formula: Volume × beverage multiplier × (100% − ice%) = ml credited toward your goal.
📊
App: History
Track your progress over time
📊
Reading the History screen
Tap the History tab to see your past performance by month.
📄
Month Navigator
Use the left/right arrows to browse previous months. The current month is shown by default.
📈
Month Summary Card
Shows total days goal was met, your daily average intake, and your best streak for that month.
📉
Sparkline Chart
Bar chart of every day in the month. Teal = goal met. Orange = ≥80%. Grey = no data. Bars are proportional to % of goal.
📅
Day Cards
Scrollable list of each day (most recent first). Shows date, goal status badge, fill bar, and ml consumed vs. goal.
🔒Full history (beyond 30 days) requires an active SipCube Pro subscription.
🏆
App: Badges
Earn milestones by building your streak
🏆
How badges work
Reach 90% of your daily goal to count a day toward your streak. Hit consecutive days to unlock badges.
🌿 3-day streak
🔥 7-day streak
⭐ 14-day streak
🌞 21-day streak
👑 30-day streak
🚀 60-day streak
🍸 90-day streak
🥇 365-day streak
🔒
Locked badges
Shown greyed out with a progress indicator: “12 days to go” or “Unlocking…” when your active streak is approaching the milestone.
✓
Earned badges
Show in full colour with the date earned. A full-screen animation and share option appear the moment you unlock a new badge.
☂
Grace day
You get one grace day per 30-day period. If you miss a day, activate it in Settings → Streak to protect your streak. It resets after 30 days.
⚙
App: Settings
Customise your profile, goal, device, and notifications
⚙
Settings overview
Tap the Settings tab (bottom navigation) to access all configuration options.
👤
Profile
Update name, weight, activity level, and biological sex. Changes recalculate your goal immediately.
🌎
Preferences
Toggle between metric (ml) and imperial (fl oz). Set your wake time and bed time to define your daily drinking window.
🎯
Hydration Goal
View your calculated goal with a full factor breakdown. Set a custom override if you want a fixed daily target instead.
💊
Supplements & Medications
Check any supplements or medications that increase your water needs. Each adds a ml modifier to your calculated goal.
🏃
Sporting Events
Schedule workouts or sports events. Your goal automatically increases on event days. Supports one-time, weekly, and biweekly recurrence.
🔌
SipCube Device
Connect, disconnect, or reset your SipCube S1. View battery %, last seen time, and paired bottle. Run recalibration from here.
🔥
Streak
View your current streak and grace day status. Activate your grace day here if you missed a day and want to protect your streak.
🔔
Notifications
Configure when and how SipCube reminds you to drink.
1
Enable notifications
In Settings, toggle Enable Notifications on. Grant the permission prompt that appears.
2
Set your reminder frequency
Choose how often you want reminders: every 1 hour, 1.5 hours, or 2 hours within your drinking window.
3
Enable Smart Mode (recommended)
Smart Mode suppresses reminders within 30 minutes of a logged drink, and increases urgency if you’re behind on your goal as bedtime approaches.
4
Choose individual notification types
Toggle specific alerts on or off: Reminders, Goal reached, Streak at risk, New badge, Low battery.
🔔Reminders never fire outside your wake–bed window. If you share your phone with others, your reminders stay private to your schedule.
⭐
App: Subscription
Free vs. Pro features and billing
⭐
Free vs. Pro
The SipCube S1 device ships with Pro included. After the included period, Pro renews annually — pricing displayed at checkout.
Free
✓
Hydration goal calculation
✓
Daily logging & streak system
✓
Badge milestones (8 levels)
✓
Basic history (30 days)
Pro
✓
Everything in Free
✓
Weather-adjusted daily goals
✓
Smart notifications (7 types)
✓
Full bottle library (25+ models)
✓
Full history & monthly analytics
✓
BLE smart cube integration
✓
Google Health Connect sync
🔄To restore a purchase on a new phone: tap Settings → Subscription → Restore Purchases. Purchases are tied to your SipCube account, not the device.
📑
Reference
Goal formula, troubleshooting, and specifications
🎯
How your goal is calculated
SipCube uses IOM 2005 standards as a base, then applies up to 9 modifiers.
| Factor | Modifier |
|---|---|
| Base rate (male, per kg) | 38 ml/kg |
| Base rate (female, per kg) | 31 ml/kg |
| Age ≥70 | +250 ml |
| Age ≥55 | +150 ml |
| Age <18 | −150 ml |
| Activity: Moderate | +400 ml |
| Activity: Very Active | +750 ml |
| Activity: Athlete | +1,250 ml |
| Temperature (heat tiers) | −100 to +1,000 ml |
| Humidity (high or very dry) | +100 to +400 ml |
| Elevation >1,500m | +7.5% |
| Elevation >2,500m | +15% |
| Pregnancy | +300 ml |
| Breastfeeding | +700 ml |
| Sporting event (same day) | +500 to +1,000 ml |
| Custom offset (Settings) | User-defined |
📋The calculated goal is always clamped between 1,500 ml and 6,500 ml. You can override it with a custom value in Settings → Hydration Goal.
🔧
Troubleshooting
Common issues and how to fix them.
| Issue | Solution |
|---|---|
| SipCube won’t appear in scan | Press button once to wake it up. Ensure Bluetooth is on. Keep phone within 1m. Restart both devices if needed. |
| Sips not being detected | Check device is connected (LED off = tracking). Ensure bottle is calibrated. Try recalibrating via Settings. |
| App shows wrong water level | Tap “Refilled” on the Home screen each time you refill the bottle so the sensor can recalculate. |
| Red LED won’t appear on pad | Ensure USB-C cable is fully inserted. Try a different power source. Reseat the cube on the centre of the pad. |
| Streak broke unexpectedly | Activate a grace day in Settings → Streak (if available). Contact support if you believe this is an error. |
| Notifications not arriving | Check phone notification permissions for SipCube in iOS Settings / Android App Info. Ensure notifications are enabled in the app. |
| Purchase not restoring | Make sure you’re signed in with the same account used to purchase. Tap Settings → Subscription → Restore Purchases. |
📧Still stuck? Email [email protected] with your device firmware version (visible in Settings → Device) and a description of the issue.
📄
Device Specifications
SipCube S1 hardware details.
| Spec | Detail |
|---|---|
| Sensor | Waterproof pressure sensor |
| Dimensions | 1.5″ × 1.5″ × 1.5″ cube |
| MCU | Seeed XIAO ESP32-C3 |
| Connectivity | Bluetooth Low Energy (BLE 5.0) |
| Charging | Wireless (proprietary pad, USB-C power in) |
| Waterproofing | IP68 |
| LED | Single RGB LED (blue = on, red = charging) |
| Compatible liquids | Still, non-carbonated, ≤140°F / 60°C |
| Minimum bottle diameter | 50mm internal |
| App compatibility | iOS 15+ · Android 8+ |